Docking Bay Access: Difference between revisions
From X-Fusion Wiki
Jump to navigationJump to search
Mysterypaint (talk | contribs) Created page with "{{Adjacent rooms |north=Red Kihunter Shaft |west=Metal Pirates Room }} x512px Sector: Main Deck (MDK) == All Categories == == Items == * Norfair Power Bomb 2 aka Power Bomb of shame" |
Mysterypaint (talk | contribs) No edit summary |
||
| (12 intermediate revisions by the same user not shown) | |||
| Line 1: | Line 1: | ||
{{Adjacent rooms | {{Adjacent rooms | ||
|north=[[ | | northwest = | ||
|west=[[ | | westnorth = | ||
| north = | |||
| northeast = | |||
| eastnorth = | |||
| westupper = [[Docking Bay Climb]] (South East) | |||
| west = | |||
| eastupper = [[Docking Bay]] (North West) | |||
| east = | |||
| southwest = | |||
| westsouth = | |||
| south = | |||
| southeast = | |||
| eastsouth = | |||
}} | }} | ||
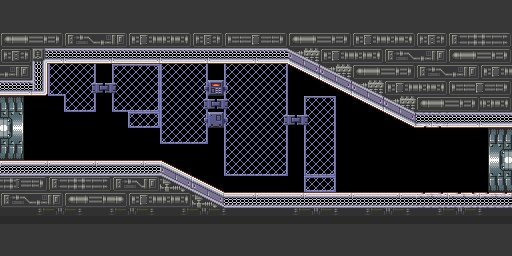
[[File: | [[File:MDK Room 7.png|x512px]] | ||
Sector: [[Main Deck (MDK)]] | Sector: [[Main Deck (MDK)]] | ||
== | == Randomizer Logic == | ||
== | === Room Purpose === | ||
<!-- e.g., Major Item Room / Connector / Boss Room / Event Room / Save Station --> | |||
=== Entrances / Exits === | |||
<!-- Document each direction individually. For door randomizer, list requirements for BOTH ways if different. | |||
Example format: | |||
'''Northwest''' → [[Room Name]] — Requirements: (list) | |||
'''Westnorth''' → [[Room Name]] — Requirements: (list) | |||
... --> | |||
;Northwest: | |||
;Westnorth: | |||
;North: | |||
;Northeast: | |||
;Eastnorth: | |||
;Westupper: | |||
;West: | |||
;Eastupper: | |||
;East: | |||
;Southwest: | |||
;Westsouth: | |||
;South: | |||
;Southeast: | |||
;Eastsouth: | |||
=== Traversal Hazards === | |||
<!-- Lava, water, darkness, crumble blocks, low gravity, spikes, strong enemies, etc. --> | |||
=== Mode-Specific Logic === | |||
<!-- List separate logic considerations per difficulty --> | |||
==== Easy Mode ==== | |||
<!-- Example: Only requires basic movement and morph ball --> | |||
==== Normal Mode ==== | |||
<!-- Example: May require careful jumps or minor sequence breaks --> | |||
==== Hard Mode ==== | |||
<!-- Example: Requires advanced movement or extra resources --> | |||
==== Omega Mode ==== | |||
<!-- Example: Requires frame-perfect tricks, TAS-only maneuvers --> | |||
=== Glitches / Tricks / Strats === | |||
<!-- Include name, difficulty, and description --> | |||
=== Resource Requirements === | |||
<!-- Ammo counts, health tanks, special suits, mobility upgrades --> | |||
=== Enemy / Boss Considerations === | |||
<!-- Strategies, damage values per mode, quick-kill possibilities --> | |||
=== Softlock / Trap Risks === | |||
<!-- Describe any situations that could strand the player --> | |||
=== Event / Trigger Dependencies === | |||
<!-- e.g., Room is flooded until Event X, door locked until Boss Y --> | |||
=== Respawn / Recovery Options === | |||
<!-- Nearby refill stations, ammo drops from enemies --> | |||
Latest revision as of 06:23, 9 January 2026
| Docking Bay Climb (South East) | Current Room | Docking Bay (North West) |
Sector: Main Deck (MDK)
Randomizer Logic
Room Purpose
Entrances / Exits
- Northwest
- Westnorth
- North
- Northeast
- Eastnorth
- Westupper
- West
- Eastupper
- East
- Southwest
- Westsouth
- South
- Southeast
- Eastsouth
